


We touch down on the palace's outer entrance; it's situated within an Indian city whose numerous temples are directly in view. The temples occupy both the scrolling background and the front layer, with those in front displaying only their top portions--a technique that creates the sense that we're high above the surrounding city; perhaps atop a small mountain, from which we view it in all its splendor.
The musical theme, as you'd expect, has an Indian flavor to it; the piece has a curiously neutral tone to it, which breeds a feeling of uncertainty. It makes us wonder about what awaits us here and whether or not it's friendly.
This outer entrance represents the first of two stage sections. It contains some basic challenges--light platforming/climbing and standard enemy-engagement. Those guarding it include the usual gangsters, which are now wearing traditional Indian clothing (a kurta, a dhoti and a turban), and boxing turtles. Though, we also encounter the newly introduced snake charmers, which slowly stalk us. Periodically a charmer will blow into its pungi, which when played releases a musical note that waves toward us. If a note makes contact with us, we'll be stunned and thus set up for an attack: The snake that rests within the bowl as seen on top the charmer's head will drop down, slink forward, and bite us. The charmer's face is its vulnerable point, though the associated hitbox is frustratingly tiny and a bit inconsistent; you may have to hit him in the face several times before any of the shots register. Conversely, you can take him out instantly with either the Popcorn or Bubblegum Shooters, if you've got the ammo available.
Five of the first six enemies drop peppers; this gives us the opportunity to fill up our Temper meter and thus activate our Quack Attack, doing which will allow us to zip through the first half of this area.
Soon we arrive at the palace's main entrance, in front of which is a checkpoint. Upon seeing the palace, Donald recognizes it as belonging to the Maharaja. He decides that it's safe to enter.

We head directly to the throne room, where we find the Maharajah and his servants. Immediately the Maharajah offers us a challenge: If we can defeat the tiger in the palace's garden, he'll reward us with the "Sphinx Tear." We silently accept the challenge and proceed into the palace halls.
Before we can defeat the tiger, though, we have to find it. Though, doing as much proves to be difficult because this entire section is a large sophisticated maze; it's comprised of five expansive screens and multiple doors that connect to connect to each other an in arcane way. Each of the halls' numbered doors correlates to one in a different room. So we have to experiment--discover how the doors connect to each other and attempt to find the correct path. If we want to progress, we'll have to put to use all of our abilities and fully explore each room--seek out its every accessible doorway. It's important to note that you'll enter into a door simply by walking in front of it, so you'll necessarily have to jump over doors that you're looking to avoid.


You'll get lost here for a prolonged period if you fail to remember which doors take you where. Trust me: It can get quite aggravating. Make sure to keep a mental map and employ a process of elimination.
Since you're going to be here for a while (in your first play-through, at least), you might as well enjoy the pleasant scenery: The flowery wallpaper, the stone-elephant displays, and the windows that give us view of the city during sunset--a beautiful image that you'll want to observe for a few moments. The musical theme is quiet and relaxed, its light beats and soothing flute strains working to keep you feeling at ease at a time when remaining calm is important.
I like being in this place. It has a nice feel to it. Its visuals and music combine to create an enchantingly nostalgic-feeling atmosphere--one that has a way of transporting me back in time. Its emanations influence the air around me, tinging it with the same type of quality it had back in 1991.
And yes--I do need to go outside more. Thank you for stating as much.
Clogging up the halls and serving to wear us down are the same suspects: gangsters, snake charmers and boxing turtles.

When finally we find the correct combination of doors, we arrive in the garden, where the untamed tiger is being held. The tiger's is a multi-step pattern that isn't easily memorized, though this doesn't prove to be a big issue because his movements remain nonetheless predictable. Early on, he jumps back and forth two or three times and then stops to spit out a large fireball; we can avoid it by jumping over or crouching beneath it. Later on, he'll occasionally jump up to either the upper-left or -right platforms and breathe flames downward in an arc, in either direction; normally the flames travel to whichever side of the room we're not currently occupying, but there are instances, however rare, where instead they travel in our direction, so there may be some guessing involved. The tiger is large and covers a lot of ground when he jumps, so we have no choice but to crouch or slide-dash beneath him whenever he does so. To defeat him, we have to strike him in the head six times.
Once we subdue the tiger, steel double doors will appear. They instantly transport us back to the Maharajah's throne room. As promised, he rewards us the Sphinx Tear. We take possession of it and then head on out, back to the checkpoint, from which we call for transport. And now we want to travel west, over to Egypt.


Egypt represents our obligatory desert stage. Its is the typical Egyptian-themed scenery: parched, craggy terrain and a background consisting of sandy surfaces, pyramids, and temple ruins whose walls are filled with ancient Egyptian hieroglyphics. All of the space in between belongs to the sky and the altocumulus clouds that supply it scattered texture.
It's no surprise that its musical theme has an Egyptian flavor. It's livelier than the Maharajah tune but similarly toned, though it leans toward serious-sounding. It speaks of upcoming danger--of the difficult trials that lie ahead.
The action is pretty straightforward: we head rightward, platform over hill-like structures, and work our way around obstructive enemies and obstacles. The most complex structure we'll come across is a five-level pyramid; each of its levels is obstructed at some point by an impassible block. We have to find a clear path through the pyramid while dealing with the boxing turtles that patrol its every level.
At the section's three-quarters point, we come across a long pool of quicksand, across which we must jump. We meet a new enemy here: sand-dwelling gangsters that suddenly emerge from the quicksand and gravitate toward us. The best way to avoid them is to jump continuously and remain aerial as long as we can; sifting through the sand, instead, will surely result in our getting repeatedly damaged.
Other enemies include those we've already seen: gangsters of the turban-wearing variety; buzzards; and boxing turtles.
When we arrive at the pyramid of interest, we find that its door is locked. Luckily, we have the key: the Sphinx Tear, whose power causes the pyramid's door to slide open.


So now we're in the pyramid, where we face our next challenge: solving the Mystery of the Sphinx.
This first pyramid section is very similar to the Aztec ruins. It contains a lot of the same dangers: stabbing spears, rotating flame wheels, torch-throwing enemies, and flame pits. This time, though, there's a new obstacle: large sliding walls that attempt to push you into the spike walls found on either side of them. We'll have to climb over them and at certain points ride atop them.
The only minor difference is that the torch-throwing enemies are now Egyptian warriors rather than Aztec guards. They function identically.
The pyramid looks much like the Aztec ruins, though one of its visual elements is at least somewhat unique: Its background is instead comprised of cracked stone blocks, most of which are adorned with ancient Egyptian symbols (duck-themed, again). It does, however, recycle the Aztec ruins' musical theme.
Our objective here is to snake our way around to the section's top-right exit. Along the way, we can hop through false floors to locate hidden nooks, which are filled with goodies; we can tell which surfaces are false by gauging their out-of-place texturing. One such false floor is found near the exit; if we don't jump over it, we'll be dropped down a level, and consequently we'll be forced to circle back around. Though, there's actually a benefit to falling down this pit: When we examine its features, we notice that it's part of an extended shortcut that can be accessed from as far as two levels down. Taking this shortcut allows us to skip more than half the section!


The next section is all about two challenges: (1) clearing long flame pits by jumping into and off of narrow platforms that hover over them. We have to do this while dodging Podoboo-like flaming skull heads that periodically dive out from the flames. In later segments, the platforms drop after we land on them--after about a half-second. And (2) running over collapsing bridges, fast enough to where the concurrently falling flame skulls don't land on us, stun us, and cause us to fall into the flames below. We won't make it across these bridges at our normal speed; we have to instead dash or slide-dash our way across it.


Next up is a large room whose surfaces are comprised mostly of lengthy slopes, which alternate between the upward and downward varieties. The room is structured this way for a specific reason--one that will become apparent to us moments after we begin to traverse its narrow passages.
Once we're a few screens in, a snake-like flame will materialize to our left and begin to chase us. If we want to avoid being hit by it, we'll have to outrun it. That's the theme here: snake-like flames will continue to spawn and chase us, forcing us to run. However, we can easily overcome this challenge by staying in motion and continuing to dash; if we do this, the flames will never be able to catch up to us, even when our movement is being inhibited by the upward slopes.
But we have to be aware of a nasty trick at the section's end: When dropping down the final passage, we have to make sure to push up against the right wall and continue holding right on the d-pad, lest we'll land in the unforeseen flame pit at its bottom and die.

Just beyond is the puzzle room we've been seeking--the one in which we must solve the Mystery of the Sphinx. Once we move past its entrance, a barrier slams down and seals us in. Then, suddenly, the music turns urgent, its grave tone foretelling of the danger that'll soon be coming into view: the slowly-lowering ceiling.
While panicking, we look toward the ground and see that four of its blocks are specially marked with symbols: a sun, a horn-blowing face, a star, and a moon. There are no environmental clues, so we're not sure what to do here; we have to figure it out on our own and do so in a hurry--in about ten seconds, which is how long it takes for the ceiling to fully lower and thus crush us to death. The solution, we figure (probably after dying a few times), is to jump on the blocks in a certain order.
Just then, we remember that Goofy gave us a note that mentioned these specific symbols. So we head to our inventory and "Look" at the note. It reads "1 SUN 2 MOON 3 STAR." That's the solution! We waste no time in jumping on the blocks in that order. And it works: The ceiling retracts and returns to its normal position!
Now that we have free rein, we can climb the wall to our right. At its top, we find the Scepter of Ra (an obvious Raiders of the Lost Ark reference). When we take possession of the scepter, the blocks to our left fall away and reveal a ladder, which grants us access to the final section. (It's actually possible to bypass the entire ceiling-lowering sequence. You can do this by hastily maneuvering your way over to the wall and climbing to its top before the ceiling has chance to lower far enough. You'll just barely make it.)

As we climb down the ladder, it suddenly breaks apart, and consequently we drop down helplessly. Fortunately, we land in a minecart, which promptly begins to move left at a very high speed. Though, there's no real challenge here; all we have to do is jump between three minecarts (think of this sequence as a rudimentary version of a Donkey Kong Country minecart stage). Our reflexes will tested here, yeah, but only slightly. This sequence exists, more so, to supply us some goodies on the way out; they're hovering about everywhere.
The final minecart carries us back to the pyramid's entrance. From the nearby checkpoint, we call for transport and then set our sights on our next destination: the South Pole.


And now we're at the obligatory ice stage. Specifically, we're atop some ice-covered mountains.
The South Pole's is another engrossing background; it's populated with snow-covered mountains whose assemblage stretches far into the distance, where it becomes one with the softly colored multi-layered horizon; the mountains in front are surrounded by a frozen lake, which serves to isolate groups of them. All such objects are richly shaded with light- and pastel-purple hues. It's really pretty imagery. And if we climb up high enough, we'll also see the glowing lights of an aurora borealis--another neat little visual!
The musical theme is upbeat and cheerful-sounding. It also has a tropical flavor to it, the piece formed mostly of marimba strains. You'll feel compelled to smile and sway from side to side as you listen to it. And this is the happiest you'll ever feel in an ice stage.
In this first section, we have to travel up and over series of mountain tops, all of which are comprised of lengthy slopes. The surfaces here are slippery, of course, so we'll struggle to stay in control as we traverse up and down the many inclines. There's a cool visual effect here: Some of the mountain tops appear to be situated in the background, one plane over. If we want, we can simply pass in front of them; though, we can also jump onto them via their slopes and climb to their tops, doing which is advisable because it allows us to bypass the annoying enemies that clog up the lower level.
Some of the peaks have loose ice blocks attached to them. They break off the moment we make any kind of contact with their surfaces. If we can firmly plant yourself atop them, we can ride them down the slopes; this works in our favor because the blocks transport us along at high speeds and they also plow through enemies.
Those enemies include parka-wearing gangsters that fire out bombs in arcing trajectories; parka-wearing buzzards that drop bombs; and the newly introduced penguins, which waddle along the ground in our general direction and slide toward us when we move to within proximity of them.
When we reach the section's checkpoint, we look to the ground and see a key frozen within an ice block. Donald wonders how he can free the key from the ice's grasp. Fortunately, we have the means: the Scepter of Ra, which has the power to melt away the ice (presumably by blasting it with sunlight as refracted through the jewel on its headpiece); it works its magic and helps us to gain possession of the key--the Viking Key, as the game calls it. Now we need to take it somewhere.
We can access the next section from here, though we can't travel past its starting point because there's a huge gap separating it from the rest of the area. Buzzards continuously fly by, we notice, but there's nothing we can do with them. So instead we head to the checkpoint and call for transport. One of our map locations, coincidentally, is a "Viking" Ship, which is apparently sailing about the sea in the far north. Surely someone on this ship can tell us about the key, we figure.


We touch down on the "spook-ridden vessel" (as the manual identifies it) and specifically on its bow.
The Viking Ship's is the expected decor: sails, masts, rigging and wooden planks, a lot of them tattered and shredded. In fact, the entire ship is in a dilapidated state. Otherwise, the deck is littered with barrels, most of which are stacked. And, in a nice effect, the ship continues to bob up and down, which creates the feeling of movement.
The background provides us a pleasing view of a cloudy night sky and its lustrous moon, which seems to follow us as we maneuver about.
Our accompaniment is high-spirited pirate music--a swashbuckling tune that's notable for its booming bassline and inspiriting progression in which every note sequence works together to build toward a powerful crescendo. It really captures the spirit of pirate life. As you listen to it, you'll want to find a mug and begin swinging it from side to side.
So while we're here, we need to find someone who can tell us about the Viking Key. We start by heading right, across the deck.
The ship's crew members will look to stop us. First we encounter the newly introduced viking warriors, who suddenly emerge from the barrels and fire off arrows before crouching back down. We can stun them with our plunger, eliminate them with popcorn shots, or bubblegum shots to simultaneously destroy both them and the barrels that contain them. Or we can simply jump over them and move forward unmolested, since they can't turn around. Other enemies here include vanilla bomb-firing gangsters and bomb-dropping buzzards.
Along the way, we have to look out for rotted surfaces; they crumble away almost instantly, so we have to make sure not to traverse upon them. If we do, we'll fall into the pits below them and die instantly.
When we reach the deck's end, we have to climb up its mast to reach the next section.


Our climb takes us up to the quarterdeck, whose spar is home to a crow's-nest-like lift. When we jump into it, it beings transporting us upward. It brings us to the ship's top portion, which is comprised of traversable sloped rigging. As we traverse it, we alternate between climbing sloped structures and riding in more of those crow's-nest-like lifts. Obstructing us are the same bomb-firing gangsters and bomb-dropping buzzards.
As we near the section's end, we need to stay in motion because there's a trap waiting for us: a final bridge that collapses as we walk over it. If we remain idle for even a second, we'll fall to our death.
Once we're at the end, we can climb down a ladder and advance to the next section. We can also drop down from the right, doing which, strangely, doesn't kill us even though this final platform is in proximity to and level with the collapsing bridge. Oh, silly video games and your arbitrary nature.

We fall onto the deck's far side, where we locate the ship's captain. He doesn't waste time introducing himself. Rather, he bluntly requests that Donald head inside the ship and eliminate all of the ghosts that are haunting its interior. Donald decides to satisfy the captain's request and does so without asking a single question. The deck's far side is also our checkpoint, so we don't have to engage in ghost-hunting right at this moment. We can go pick up some ammo, if we need to, and then come back here.
The entrance to the interior is blocked off by a wooden board with a keyhole in it. It can only be opened with the Viking Key, which we happen to have.


When we drop into the ship's interior, we arrive in its multi-screened, multi-leveled quarters. Its outer screens encircle a mass of stacked crates that comprise the room's center. So basically this room is one giant circle.
In the crimson-colored background, we see the crew's dining tables, some decorative axes, portholes that give us view of the night sky, and the lanterns that provide this place its fiery hue.
There are many ghosts flying about this place, yes, but there also more arrow-firing vikings, bomb-firing gangsters. There's also a newcomer, who is hanging around the room's bottom-right corner: a tall husky gangster, who runs back and forth over a specified area before stopping to flex; though, because he's unable to hide the fact that he's winded--that, in fact, he's completely out of shape--he soon starts to pant, and his gut falls out. He seems to be impervious to all of our weapons, though he does have a vulnerable state; it's when he's fatigued, at which point he's susceptible to damage. However, this vulnerable state only lasts about two-tenths of a second, so our window is very tiny. My sense is that most people will never realize that this guy has actually has a weak point. It's better to avoid him--jump over him if you can find a way to do so.
Our main issue is that we can't actually hurt the ghosts with our current weapons, which means that we have to do something else to eliminate them. We search for an answer by investigating the space around us, though all we wind up doing is going in circles. Soon we start to sense that there's nothing else here--nothing that we can use to eliminate the ghosts. So ultimately, we decide to employ the use of Metroid-style exploration and begin to shoot at and hug every wall with the intention of seeking out hidden passages; by doing so, we discover that the center crate-stack is home to two such passages. The one at the top left leads into a nook that's filled with goodies while the one found at its middle-right portion leads to the room's true center point, which is home to steel double doors. When we walk through them, we find our real target: the viking ghost, who's directly responsible for the haunting. He wields a hammer and a shield. So begins our next boss battle.
The viking ghost's pattern isn't consistent, no, though it still isn't terribly complicated: He remains stationary and throws his hammer like a boomerang, either straight ahead or in a loop. After doing this one or two times, or after we move in too close, he'll break apart and piece by piece transport himself to the room's opposite side. We can hurt him by striking his vulnerable point: the top part of his head. Though, we can only do this before he attacks because he shields himself when the hammer is flying about. After we successfully strike him, he falls to pieces and then pulls himself back together, thus restarting the cycle. We have to strike him seven times to defeat him.
After we vanquish the viking ghost, steel double doors appear on the room's right side. They instantly take us back to the checkpoint. When Donald arrives there, he asks the captain to hand over the Viking Diary, as he promised to do. Though, the captain is unable to grant this request because he doesn't actually have the diary (he tricked us into doing a job for him). But he does know of an old legend that that speaks of the diary; it says that it's hidden in the ice somewhere in the South Pole.
As a consolation, he rewards us the Viking Plunger (whose actual name is the "Green Plunger"), our final plunger upgrade; it can be used, he says, to "fly with by catching things that fly." What Captain Wordsmith means to say is that we can fire it upward into non-hostile buzzards, to which it'll stick, and ride along with them. That's what we need to do in the South Pole.

When we arrive back at the checkpoint, we head right, to the next section, and wait at the cliff. When a buzzard flies in from the left, we fire a plunger up into it and then grab onto the handle. Now we can fly along with it and clear the long gap. While we're attached to a buzzard, we have direct control over its vertical movement. We have to exercise this control to avoid making contact with the red-parka-wearing bomb-carrying buzzards that continuously fly in from the right and do so at multiple horizontal points; when dealing with those that enter from higher points, we have to remember to fly as low as possible to avoid getting hit by the bombs they drop. Since our buzzard friend moves slowly, it's best to stay centered and then shift up and down accordingly.
At the end, we drop off onto the opposite cliff and subsequently enter the next section.

Now we're in a rough-looking area of the South Pole. Its are darker, harsher surroundings. The sky is completely overcast and thus the environment has been robbed of its glow; the uninfluenced surfaces instead exhibit stark dull-gray coating.
Though, this bleak appearance isn't so much a feature of an unpleasant-looking, depressing scene as much as it is a special ingredient in one of the game's most engrossing visual displays. Every layer contributes something to it: There's (a) the ocean, which is animated across four separate background layers, each of which moves at its own speed and helps to create the image of waters that are flowing mercilessly; (b) the cloud cover, which animates over five layers, including one in the foreground, and appears to be whirlwinding around you; and (c) the water that comprises the foreground layer's base and completes the scene of a surrounding, engulfing ocean. Together these visuals create an enveloping effect that makes you feel as though the environment, itself, is an enemy--that the world surrounding you is alive and waiting to strike. If anything, it just looks really cool.
This entire section is based around jumping from one floating structure to the next. Some dip a bit when you land on them, creating the fear that they'll soon sink. They don't; they merely bob down a bit. But the shaky manner in which they bob down does nonetheless make us feel nervous--feel as though that, yeah, they might actually sink--and thus it serves to disrupt your rhythm. Other structures rise up when we approach them and then begin to undulate. At several points, killer whales will pop out from the watery gaps and bite at us as we jump about. Our jumps can reliably carry us over these whales, yes, but we still have to be careful; if we mess up our timing (when we, say, get nervous while approaching the edge of a bobbing structure) and make contact with a whale, we'll temporarily lose control and likely fall into the ocean.
And whenever we're on solid ground, more of those penguins will waddle toward and slide in our direction.


The final section is a large multi-screened, multi-leveled area, most of which is comprised of a maze. The first thing we need to do is gain access to the maze. We can do this by breaking through the surface--by clearing away a set of obstructive ice blocks with our Bubblegum Shooter and thereafter dropping down through the newly created opening. Apparently the Viking Diary is somewhere within the cave below.
What we have to do here, basically, is use our climbing and slide-dash abilities to navigate through narrow passages and ultimately curl our way around to the cave's center. Along the way, we have to continue to clear away obstructive ice blocks. Though, we can only clear away the blue ones; the purple ones, we find, are indestructible. And we keep at it until we reach the cave's center, which is formed from an assemblage of ice blocks; once we're there, we have to break through to the structure's core, whose middle blocks hold a secret: Behind them is the Viking Diary, our desired object!
Of course, enemies will attempt to disrupt our exploration efforts. As we maneuver our way around, we'll be assaulted by a husky gangster and the newly introduced walruses, which aggressively undulate about and clog up the cave's narrow passages. Also, they break their way through any ice blocks with which they make contact, so there's no way to halt their movement or contain them; if we encounter a walrus within a cramped space, we'll have no choice but to eliminate it.
After we obtain the diary, we can escape the cave via an express exit that leads back to the section's starting point (we couldn't drop down from here because this passages' obstructive blocks can only be cleared away from below).
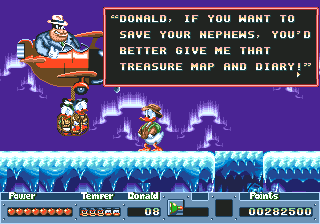
When we arrive back at the starting point, a biplane flies in. Though, it's not Donald's; rather, it's Pete's. And his is far from a friendly visit: He came here to inform Donald that he has kidnapped Huey, Dewey and Louie, who can be seen hanging from a rope trap. "If you want to save your nephews," he says, "you'd better give me that treasure map and diary!"
Donald complies and hands over them over. Pete takes possession of the items, releases the kids, and then quickly flies off. Huey, Dewey and Louie apologize for letting themselves get captured and costing Donald his fortune. Though, they're not yet ready to concede defeat; rather, they see a chance to salvage the mission. They encourage Donald to attempt as much; they suggest that the group hurry over to their biplane and chase Pete down.
At this point, control is taken away from us and we automatically follow Pete across the map. We wind up heading west, toward an unmarked island. It's there to which Pete escapes. It's where his hideout is located.


So we head toward the imaginatively named "Hideout" area, where Pete and his gang are hanging out. When we arrive there, we touch down in a dark forest.
Immediately this place has a mysterious vibe to it--one that causes us to feel uneasy. As we look around, we nervously wonder about what dangers are concealed within this shrouded environment. Working to intensify our feelings of apprehension is the background imagery--a vast web of neglected foliage that conspires to block out the surrounding landscape and keep us hemmed in; it wants us to remain oblivious to what's happening around us. Though, a few scattered openings do give us a peek of what lies beyond the web: a sign of vitality--lush green rustling foliage, seeing which provides us momentary comfort (because it's 1991 and we're scared 10-year-olds).

I can only describe its accompaniment as serious-sounding, urgently toned island music. Its presence is appropriate when you consider the nature of our current predicament.
The hideout's first section contains a collection of challenges old and new. To start, we have to climb up a lengthy slope while dodging bouncing spring-legged blocks (which previously acted as Thwomp-like crushers in the Aztec ruins). Then we have to travel over an expansive gap by hitching a ride with a buzzard, and along the way, again, we have to evade leftward-moving buzzards (those that carry beehives rather than bombs). Next we have to platform up and over a series of ascending earthy structures and time our jumps so that we don't make contact with the angry piranhas that dive out from the pools of water that rest between them. In following, we have to dash across a series of collapsing bridges as snakes drop in from offscreen. Then we have to work our way around a group of snakes that occupies the many surfaces of a series of multi-level structures. And finally, we ride a pulley down to the hideout's entrance.

The hideout's first section is comprised of an underground rail system that we navigate via the use of minecarts. It's a rather short section; we only have to jump between three minecarts. Much like Egypt's minecart sequence, this one exists more so to supply us some goodies (money bags, mainly).
We exit into a large mine. Its background elements--carved pathways, steel beams and girders--tell us that this base is still under construction. Other visual features, like the cannons and large vats, suggest that Pete and the gang are manufacturing weapons in this place.
The music here is simply bizarre. It's formed from a mix of random percussion strains, and it's almost completely absent of structure. It winds up functioning more as an unsettling ambiance. That's probably how the level designer wants you to feel as you traverse this section.

There's a theme to this section--a recurring platforming challenge. It's one that's weird, yes, but very unique. Basically we have to clear long gaps in a room that's mostly bottomless. Though, we have to do it by jumping onto and off of strangely functioning platforms. What we see as a single platform is actually seven platforms aligned in a row along the z-axis. Suddenly these platforms expand in all directions, forming an X shaped alignment, and they do this for about four seconds before contracting. Our job is to jump across a series of them and in doing so work our way up or down to the extended formation's upper- or lower-right platforms. We want to locate the branches that carry us over to the next visible formation, to which we have to quickly jump.
The physics involved are kind of iffy. Really, you never know which platform you'll be standing on when they extend outward, so it's easy to get disoriented and instinctively overcorrect to the point where you slip off the platforms and drop into the pit. For this reason, you have to be extra careful when you're maneuvering around their branches.
You can't reach the exit from the final formation because it doesn't extend out far enough, so instead you have to pull off a tricky maneuver to escape from here: You have to fire a plunger into the wall below the entrance and then (a) quickly jump up to the extended formation's upper-right platform and (b) from there make a long, perilous jump onto the plunger's handle; and this has to be done within six seconds, before the plunger disappears. It's a nice bit of level design, I say.


Now we're in a more-completed section of the mine. This one has solid surfaces and active systems (like the boiler system we see at the section's starting point).
Early one, we ascend diagonally up the mine's scaffolding while dealing with boxing turtles, bomb-firing gangsters, bomb-dropping buzzards, a husky gangster, and those on those on-wall loudspeakers we saw back in Duckburg. From the highest platform, we enter into a shaft whose openings lead down into what looks like a ventilation system; we drop down into it and slide-dash our way through its maze of narrow passages, twisting around until we find an exit point. Note that there are two openings into which we can drop and the second one deposits us directly into a death pit. Because the level designer is mean.
The exit point takes us to an elevator, which we ride down to the area's bottom portion. We do so while under assault from tomato-firing gangsters, who are parked in the little nooks located on either side of the elevator shaft. We have direct control over the elevator when we're in it, so we can shift up and down to avoid the shots and generally time our movement. From here, we take a second elevator up to the section's exit point and do so while once again under assault from tomato-firing gangsters.


Finally we locate Pete, who is standing there waiting for us. He tells us that he'll return the Viking Diary if we can defeat him. "Ha, ha, ha..." he chuckles confidently as he initiates the battle.
Pete descends into an unseen underground passage and reemerges second later in a rail machine that's slotted into the track line that has been installed onto the room's back wall. He moves along this track and attempts to (a) corner us and inflict contact damage and (b) attain favorable overhead position and crush us with the machine's extending piston--this whenever we're directly below him. The room is formed from four screens in a 2-by-2 arrangement, and each screen is uniquely structured; we can use the screens' unique geometry to our advantage--find spaces to which Pete has trouble traveling or higher ground from which we can fire shots at him while he's ascending. Only Pete's head is vulnerable; we have to strike it ten times to defeat him.
Looking to make things more difficult for us are the tomato-firing gangsters that have been posted in the room's upper- and lower-right corners. They'll constantly interfere unless we do something about them. We can stun them with our plunger, yes, but it's better to permanently remove them with either the Popcorn or Bubblegum shooters; this way, we won't have to worry about them, and we can instead focus all of our attention on Pete.
When Pete has had enough, he admits defeat by waving a white flag. He gives us back the diary and then quickly splits.
We can't exit this room conventionally (by simply walking through the door or calling for transport); rather, we have to trigger an event. We do this by reading the diary, whose text states that the real treasure location will appear on our map if we dip it in water. When Donald does so, a new area called Great Duck Treasure Island appears on the map. We fly there automatically.


And it's another secret island. Its first section is aesthetically similar to the Hideout's: It's a forest scene, and its background's collection of trees and webbed foliage obscure the spaces beyond. This time, though, the plant life comes in a healthier green shade and we get a partial view of the forest areas in the distance. The Aztec ruins/pyramid track is recycled here, and it works well to provide the scene an air of mystery and uncertainty. This feels appropriate because we have no idea where we are.

This first section is also structurally similar to the Hideout's: Early on, we ascend up a lengthy slope and evade both bouncing spring blocks and later snakes, which drop in from offscreen. Then we have to clear two long gaps by jumping onto and off of the giant leaves that float between them; they drop off the screen a split second after we land on them, so we have to jump off of them as quickly as possible. After engaging in some basic platform-hopping, we have to ascend our way down into a cave by dropping through a series of passages; specifically, we have to stand on series of rotting planks and let them collapse beneath us so that we can drop further down. There are multiple paths we can take, but all but the correct combination of paths deposit us into a death pit; if we take the rightmost path at every branching point, we'll safely arrive at the cave's bottom.
From there, we climb to the section's exit by jumping upward, back and forth onto and off of jutting vines that ignite and start to burn up when you land on them.


The forest leads into a temple. Not surprisingly, it bears a strong resemblance to the Aztec ruins/pyramid sections from areas past. Its background is filled with intricately carved pillars, and all of its surfaces are adorned with ancient symbols, most of which look to be Turkish in origin (and duck-themed, naturally). There's a reason why its environments are designed this way, and I'll tell you what it is in a moment.
And the temple is home to the expected dangers: stabbing spears, jumping flames, rotating flame wheels, and moving walls that attempt to push you into the spike walls that rest on either side of them. Though, it also has an exclusive enemy: gold-armored duck knights armed with shields. Like the Iron Knuckles in Zelda II: The Adventure of Link, they responsively block incoming shots by lowering and raising their shields. You have to hit to strike the very tops of their heads to stun them. Or you can simply eliminate them with the Popcorn of Bubblegum Shooters, if you have any ammo left.
Our objective here is to find the path to the exit. After exploring for a bit, we spot a passageway in the upper level's ceiling. By riding atop the leftmost moving wall, we can gain access to it--climb up through it using our plunger. At its top is the exit point.

And here, in the game's final section, QuackShot says, "The hell with allusion" and just flat out rips off Indiana Jones and Last Crusade. Immediately upon viewing its environmental elements, we observe that they're almost a perfect match for those seen in Crusade's "Leap of Faith" scene. "How ridiculously brazen," we think as we shake our heads. This is why the temple was rife with Turkish symbols; we're in Hatay, which is where Crusade's final scene took place. That's what was being telegraphed.
So we have to take our own "Leap of Faith" test. There's no ground here, of course, so we have to jump forward and hope. When we do this, we find that that the open space is hiding invisible platforms; they reveal themselves when we're in proximity to them. To reach the entrance on the canyon's far side, we have to make a series of jumps across these invisible platforms. We can either go on faith--commit to jumps and hope that platforms will be waiting to catch us--or attempt to guarantee safe landing by revealing the platforms early--by jumping forward and pulling back, doing which sometimes gets us close enough to where platforms are forced to reveal their locations.
We have to make 11 such jumps to reach the other side.


The entrance on the canyon's far side leads into the final boss' lair.
That final boss is the Guardian of the Duck Treasure--an ancient knight. He emerges from an iron construction, of which he was previously a part, and initiates the battle.
The guardian stalks about the room's center while brandishing his large sword. He twirls it for about four seconds and then throws it toward the wall on whichever side of the screen we're currently occupying. The sword slams into the wall, penetrating it. The sheer force of the impact causes an earthquake that in turn causes blocks to fall from the ceiling. Five such blocks come crashing down, with the outer three bouncing their way down the room's traversable stair-like structures. Dodging the sword is easy; we simply position ourselves above the guardian. The real problem is the falling blocks, avoiding which requires find a safe space. And we have to do this quickly, since the guardian is vulnerable only during the period when his sword is stuck in the wall and blocks are falling. We have to strike the swordless guardian 12 times to defeat him.
"Finally," he says after we best him, "someone who is worthy of the treasure."
Then, suddenly, the iron construction from which he emerged slides open and reveals King Garuzia's Great Duck Treasure. Immediately upon seeing it, Donald slumps forward in disappointment. "Oh my gosh!" he exclaims. "It is just a plain stone figurine of a duck princess!" He takes it home anyway.


In our ending scene, Donald is standing beside Daisy, looking exasperated. "Donald, it's nice to see you," she says before asking him where the treasure is. Just then, Huey, Dewey and Louie carry it in from the left. When Daisy sees what it actually is, she gets angry. "Is that all?!" she asks, her anger so intense that steam shoots out from her head.
Suddenly, though, the nephews trip over something and drop the statue; it breaks open to reveal a gold and jewel necklace, which flies across the air and lands around Daisy's neck. She assumes that Donald knew of the necklace's existence and thanks him. Before he can react, she plants a kiss on him and sends him into a trance whose hold causes him to flap his hands wildly and hover in the air.
And then the credits roll. At the same time, Donald and Daisy are seen flying the biplane across Duckburg, Mexico, the South Pole, India and Egypt. All the while, a nice little ending tune plays; it's part joyous, part soul-stirring, and all celebratory.
Enduring Thoughts
And there you have QuackShot Starring Donald Duck, a little 16-bit gem. It's a simple game, sure: Its platforming action is largely basic. Its minor enemies aren't particularly mobile. Its bosses' attack patterns are uncomplicated. And it's not terribly challenging. However, it excels in the most important areas: It moves and controls fluidly. It looks and sounds great. It's inventive in terms of its weaponry (especially in how the plunger functions), gameplay structure, and level design. And it offers a fun, enjoyable gaming experience. For all of those reasons, it's one of my favorite Genesis games. I'm so glad to have discovered it.
QuackShot, like all of the best Disney games from the 8- and 16-bit eras, is wonderfully delightful. I feel good when I play it--when I look at it and listen to it. Its emanations influence my thoughts; they evoke memories of a simpler time and temporarily transport me there. When I'm playing QuackShot, everything is right in the world.
People always say that you have to have played a game in the past to have nostalgia for it, but I don't find that to be true. You can have nostalgia for a newly discovered game, I say, because it makes you feel a certain way. Because something about it reminds you of a past era and the games with which you associate it. Or because the images it displays and the sounds it makes are the type that can only be produced by the console that you grew up with and loved.
For me, QuackShot evokes feelings of nostalgia because it possesses that "rawness" quality I talked about several hundred paragraphs ago. It just feels like an early Genesis launch game; it feels rough and experimental, like launch games typically did. And it's proud of that fact; it desires to be nothing more. For that reason, I see it as representing 16-bit gaming in its purest form. As I traverse its world and all the while examine its visuals and listen to its music, QuackShot continues to say to me, "This is what a 16-bit game is at its core. This is what made those old consoles so special--particularly when they first entered your life."
That's why I feel as though QuackShot has been with me since the early 90s.
It's interesting: I've seen a lot of forum-goers argue that the Genesis is the true successor to the NES because its library is filled with the same type of action games with which people fell in love during the previous generation--those that look, sound and feel like naturally evolved NES games. QuackShot helps strengthen that argument. It's a 16-bit-powered game, yes, but one that possesses the charming simplicity of the NES' most memorable action-based Disney games--of those like Mickey Mousecapade, DuckTales, Rescue Rangers and Darkwing Duck. It fits in perfectly with that group. Thus it yells to NES-lovers, "Look over here! There's more of that waiting for you over on Sega's shiny black box!"
My research tells me that there certainly is, so it looks like I've got a lot more "rediscovering" to do.
But as for QuackShot: I can't recommend it enough. Every fan of the Genesis and of 16-bit gaming in general should check it out. QuackShot will provide you great entertainment and at the same time evoke wonderful memories of an era when Disney games were most relevant to our lives--when they were essential pieces of our game libraries and integral parts of each console's fabric. And you'll have just as much fun now as you did back then.
Hopefully QuackShot will one day get the recognition it deserves. Hopefully it will be included in a future 16-bit Disney compilation--in a new Disney Afternoon Collection, where it would fit in perfectly, because this is exactly the kind of game that one would want to play on a quiet, sunny spring or summer afternoon. That's the best time to have fun and remember.
Because games like this are too good to be forgotten.
No comments:
Post a Comment